May Inspiration Station Blog Hop Challenge

https://inspirationstationchallenge.blogspot.com/
Oh. My. Goodness. I finally am able to get this blog post up. I have been having some whopper of issues with my blog here…. (I am in the process of up-grading it to a blog/website/store and that may have been part of the problem). But, yeay, here we go with my post for this month’s Inspiration Station project!
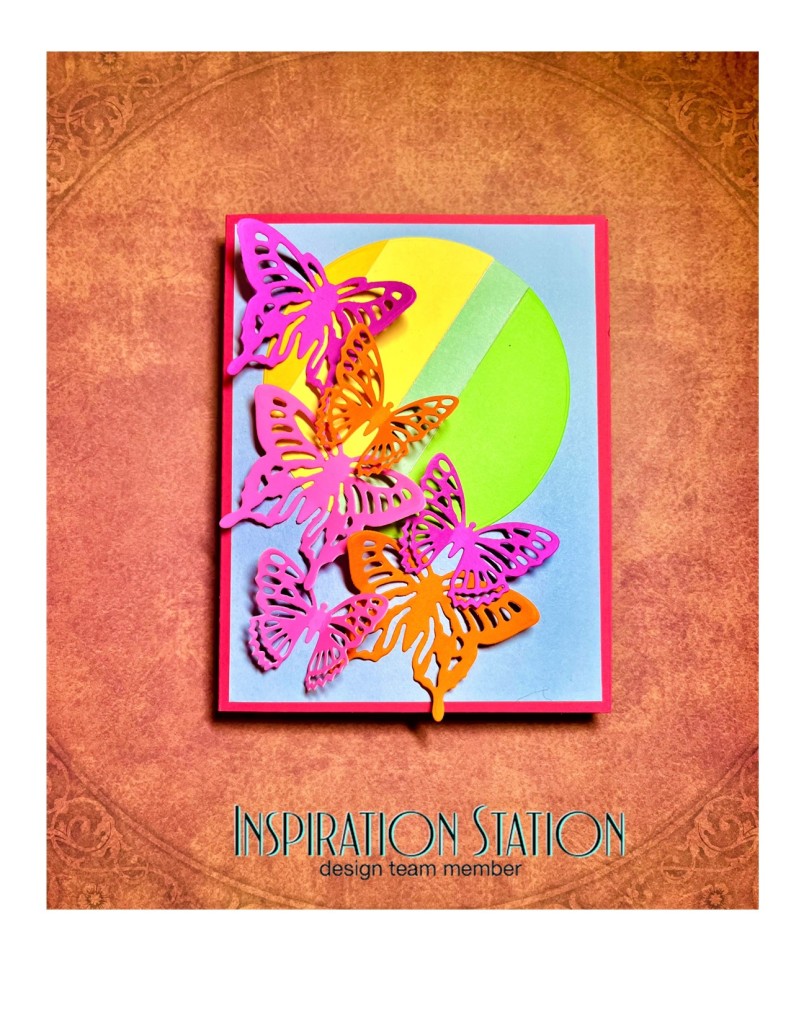
May Day!! I have fond memories of May Day celecbrations, and the most notable for me was the symbolism of this festival. Of course, you can’t not notice the bright colored ribbons weaved around the pole and the dancers who weave them. But to me it’s all about bringing in spring, and nothing says “spring” to me more than butterflies. Here in Michigan, they say the robin bird is the first sign of spring, but the robin lies like a rug! So, I only trust butterflies now, because you know they won’t be out if it’s not gonna stay warm!
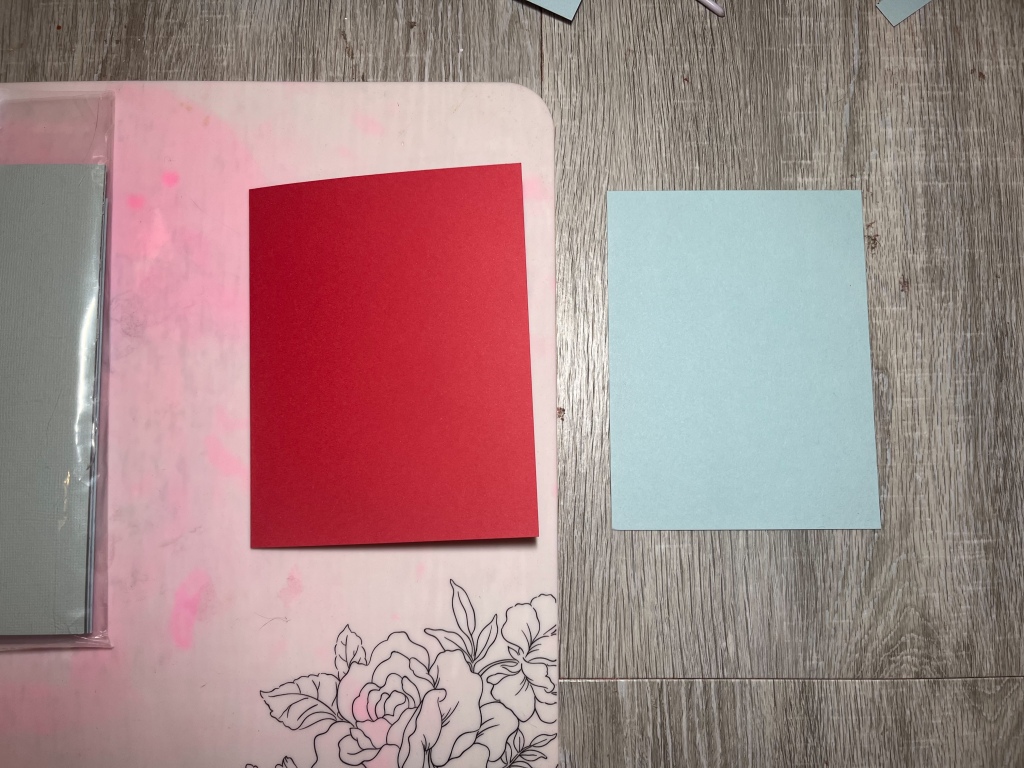
This prject starts on a bright red A2 card base with a sky blue panel.
I wanted to bring in the entire spectrum of colors into this card, and play with the concept of the cool weather giving way to the warm. To do this, I took strips of warm/cool colored cardstock and with my glue stick I adhered them to some copy paper.


Glue stick works best for this because it dries super fast and if any of it squishes beetween the layers, you can rub it off easily with an adhesive eraser once it’s dried. After it set up I used a circle die to cut our “the sun” from this layered cardtock.

I adhered this flat to the blue panel. To represent the warmth of summer, I used warm/hot colors to add a flurry of die-cut butterflies, rising up across “the sun.”


This card was very quick and simple to do, but, very effective for using up scraps which played very well into the symbolism. I hope this project inspires you. I would love to see your take on this month’s inspiration photo so please tag me on Instagram @scrappystampthefunup with your creations! In the meantime, make sure you head over to the Inspiration Station blog to check out all the amazing creations this month. Thanks for stopping by!

Get Well Hop Instagram Hop @kellys.craft

Hi everyone! I have been playing with the Organic Linen 3D embossing folder from Atenew alot lately, and really wanted to try a new technique with it. This is a 5 x 7″ side folding card with a base made from some yellow cardstock. Now, I’m sure, if you love embossing folders, then you know it can be a bit of a pickle to use them for 5 x 7″ cards. So, I hope this project gives you some new ideas to work with the sizing and really get more use out of your embossing folders.
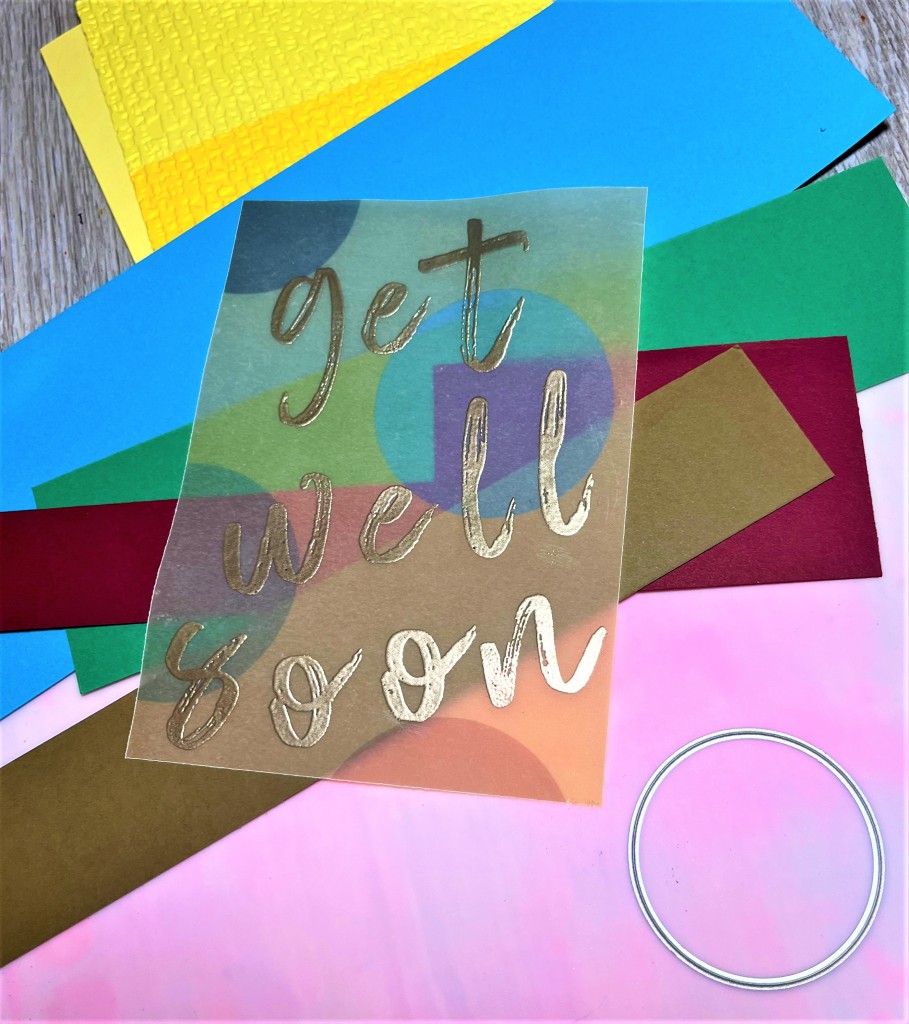
Since the theme of this hop was “Get Well”, I knew I wanted bright yellow. From my scraps folder I picked out a light, medium and darker scrap of yellow. I glued these to a sheet of printer paper.

The tip here is to use a glue stick and apply the glue to the printer paper, then adhere your cardstock to it.

If you add glue stick to the back of the cardstock and then stick it down, you are more likely to have some seepage of glue between the sections of cardstock. I let this dry for a little bit then trimmed it down to 6 3/4″x 4 3/4″ so it will have a boarder of the card base showing. Now for the embossing. I inserted this piece into the folder and taped it down with low tack tape (I love the Altenew purple tape).

I ran this through my embossing machine. I removed the cardstock from the folder and turned it around and re-inserted it into the folder.

This is the trick to emboss cardstock that is longer than the embossing folder. I taped it down again (stopping it from shifting is a trick for this embossing method) and ran it through. Because the cardstock was glued to the printer paper before embossing, I didn’t have to spritz the back of the cardstock to prevent any possible cracking that can sometimes happen. I wanted this cool background to be visible, but I also wanted to spread out my sentiment “Get Well Soon” all over the front of the card, so the best choice to make this magic happen was vellum. In my stash I had this piece with these colorful circles all over it. I played with how I wanted to cut it to maximize the colorful spots and then I trimmed it down so a good portion of the embossed background will show.

I used the Mega Brush Alpha stamp set from Atenew to create the sentiment. It’s a fabulous single letter stamp set so you can make your own words. Using my Versamark ink I embossed the sentiment to the front of the vellum with Altenew’s Platinum embossing powder.

When you can’t decide on gold, silver or a color; choose platinum! It’s such an amazing color. My next trick for this card was adhering the vellum to the embossed layer. In my opinion, vellum layers look their best when they are raised up. That means using adhesive foam tape. And that means hiding the adhesive foam tape. I chose some colored cardstock scraps that matched the colored circles on the vellum
I found a circle die roughly the same size as the circles on the vellum (I use the concentric circle set from Waffle Flower) and cut out circles.

Using my Tombow gluestick, I applied the glue to the cut circles, then I attached the cut circles to the back of the vellum.

This also made the colored circles on the vellum more intense. The Tombow gluestick is the trick here. It is just the right creamy consistancy to not be visible to the vellum when you glue to it. I set some acrylic blocks on the top of the vellum to press the vellum firmly to the circles.


When that dried I applied the foam tape to the back of the circles and attached that to the car base.

Woohoo! no adhesive showing at all through this fabulous vellum layer!!

I hope you like this project and I hope the tricks and techniques I used in this project will help you with your own crafting projects. If you try these techniques, please share here with a comment or tag me on Instagram @scrappystampthefunup. I would love to see what you do with these ideas! Also, be sure to hop along wiht the rrest of the “Get Well Soon” Instagram blog hop and stay tuned for more craftiness right here!
To get the goodies I used in this project, click the links below. I can’t wait to see how you use these techniques in your own projects!
Altenew 9th Anniversary Blog Hop Day 1
(Giveaway with over $2,500 in Total Prizes!!)

Welcome, welcome! I hope you enjoyed the amazing project from Annemarie over at:
https://thecraftykiwi.net/blog/
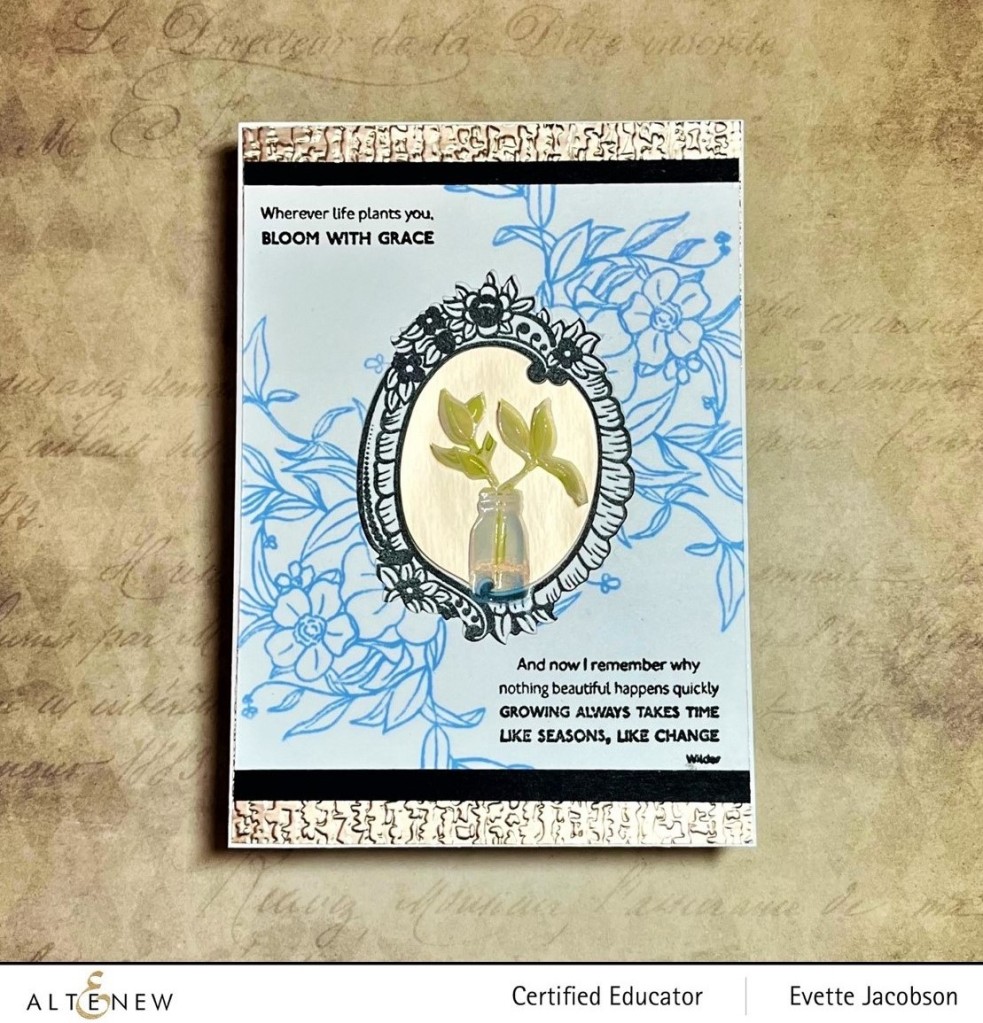
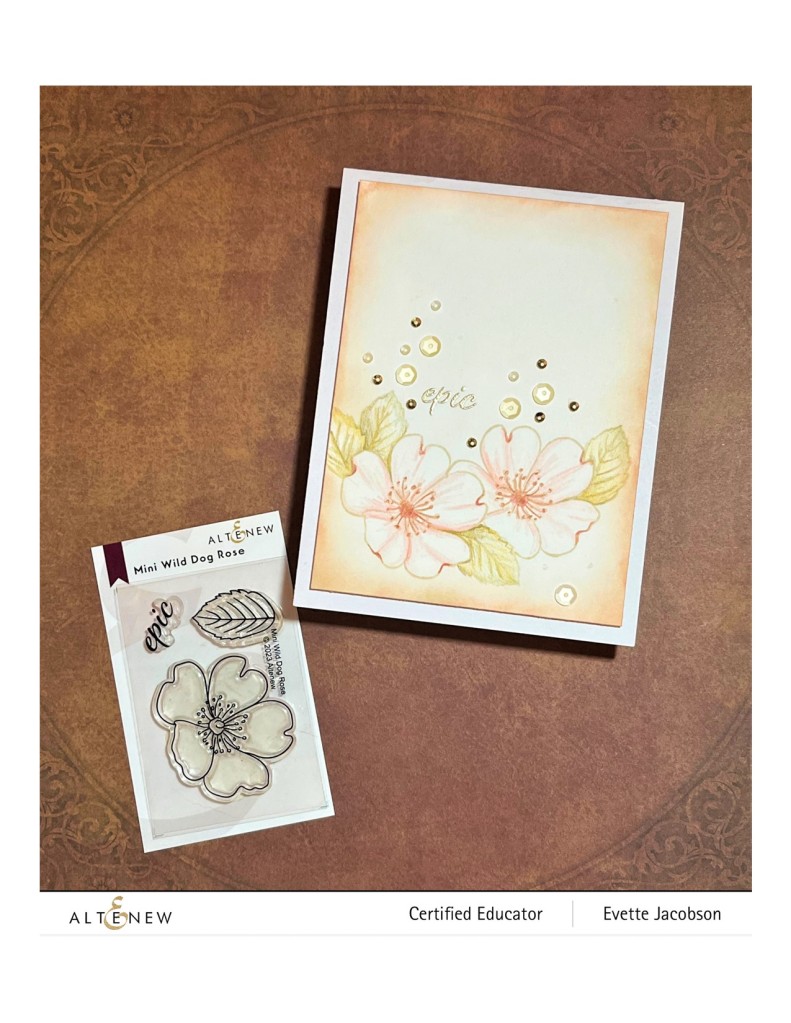
Crafty peeps, I cannot lie; I never thought I would be here posting my contribution to an Altenew Anniversary celebration along with these amazing crafty movers and shakers. But here I am, a certified educator and number 1 fan lol. My project card for this event was an homage to all the things you can do with Altenew products. We know they are known for their fabulous artistic floral designs, but they also provide us with so many cool tools and products for really any style of paper art. My card features embossed metallic cardstock, vellum accents water colored with the crisp dye inks, tone on tone stamping for a subtle background, layers and simple black and white accents. I would love to see how this project inspires you, so please comment on this post or tag me in Instagram @scrappystampthefunup.
In case you haven’t gone through all the amazing designer’s projects yet, or if you need a second look to take it all in, you can head back to the beginning of the hop, here:
https://blog.altenew.com/?p=69340
Now, what about that amazing giveaway!
9th Anniversary Special Offers
- 4/5/2023-4/6/2023: Enjoy FREE U.S. shipping with code HAPPY9TH or $9 OFF shipping on international orders over $29 with code ANNIV23 at checkout and receive a FREE brand-new Playful Wildflower 3D Embossing Folder ($8.99 value) on orders over $69. Shop here:
- 4/3/2023-4/10/2023: FREE Mini Blending Brush Set(worth $26.99) with every order of the brand-new Billowing Peonies Complete Bundle. Shop here:
Giveaway Prizes
Over $2,500 in total prizes! Altenew is giving away a $50 gift certificate to 10 lucky winners. There are also 24 awesome companies/crafty friends who are celebrating with us, and they are offering the following prizes:
- Altenew: 10 x $50 Altenew Gift Certificates
- Altenew Academy: 15 x Online Card Classes
- Artistry by Altenew: 5 x $25 Gift Certificates
- Jennifer McGuire Ink: 1 Share Handmade Kindness goodies bag ($100+ value)
- Online Card Classes: 5 x Online Card Classes
- Gina K. Designs: $100 Gift Certificate
- Hero Arts: $100 Gift Certificate
- Scrapbook & Cards Today: $100 Gift Certificate
- Michelle’s Cards & Stamps: $100 AUD Gift Certificate
- Spellbinders Paper Arts: Wax Seal Starter Kit ($50 value)
- Pinkfresh Studio: $50 Gift Certificate
- Lawn Fawn: $50 Gift Certificate
- Pink & Main: $50 Gift Certificate
- Studio Katia: $50 Gift Certificate
- Simon Says Stamp: $50 Gift Certificate
- Krafters Cart: $50 Gift Certificate
- Auzz Trinklets N Krafts: $50 Gift Certificate
- A Cherry On Top: $50 Gift Certificate
- ScrapbookPal: $50 Gift Certificate
- MarkerPOP: $50 Gift Certificate
- CiLi in Papers: $50 Gift Certificate
- Scrapbook.com: $50 Gift Certificate
- Seven Hills Crafts: £25 Gift Certificate
- Bumbleberry Papercrafts: £25 Gift Certificate
- Frantic Stamper: $25 Gift Certificate
Be sure to leave comments by 4/16/2023 for a chance to win one of 56 prizes! To make the hop more exciting, start your comment with “Hi from (city or country where you’re from)!” 56 winners will be chosen at random from the comments left on any of the blogs listed below and will be announced on the Altenew Blog on 4/21/2023.
Thank you so much for stopping by and good luck!!
April Inspiration Station Blog Post Challenge


Hello my crafty peeps! Scrappy here bringing you another Inspiration Station Blog Hop Challenge, and this one comes with a special treat! At the bottom of this post is a link to the YouTube video I did showing how I made my project for this month’s challenge. This project was so fun to make!! I used reverse stenciling to create the depth and shadows of colors on the petals of the tulips.


There are so many fabulous projects from the design team for this month’s hop, make sure to check them all out. We can’t wait to see what inspires you from the inspiration photo. Click the link below to join the challenge! Good luck!
https://inspirationstationchallenge.blogspot.com/
This project featured the Tulip 3D embossing folder and coordinating stencil set from Altenew, along with their vibrant crisp dye inks. To get you Altenew supplies, click the link below 🙂
And, as promised, here is the link to the YouTube video for this project 🙂

March 2023 Inspiration Station Blog Hop Challenge
Join the challenge here:
https://inspirationstationchallenge.blogspot.com/


Hello crafty peeps! Welcome to spring and the March edition of the Inspiration Station blog hop! This project is my take on the inspiration photo at the top of this post. This is a 6×6″ pop-out easel card and it turned out much better than I was expecting. The base is made from green cardstock from my stash. Because it’s a pop-out card, after cutting the base I had to cut an extra 6×6 card piece from the same cardstock. I set this aside to be used later in the project. To the folded card base I cut a layer of cardstock from grass designed paper and adhered it to the card face.

The next part was creating the sides to make this card pop out. I took some dark green scraps and scored them at 1/4″ spaces, for a total of 6 spaces per panel (so the scraps were 1 1/2″ wide).

I trimmed them to just shorter than 6 inches, folded them accordian style and glued them onto the sides of the face of the folded card body.
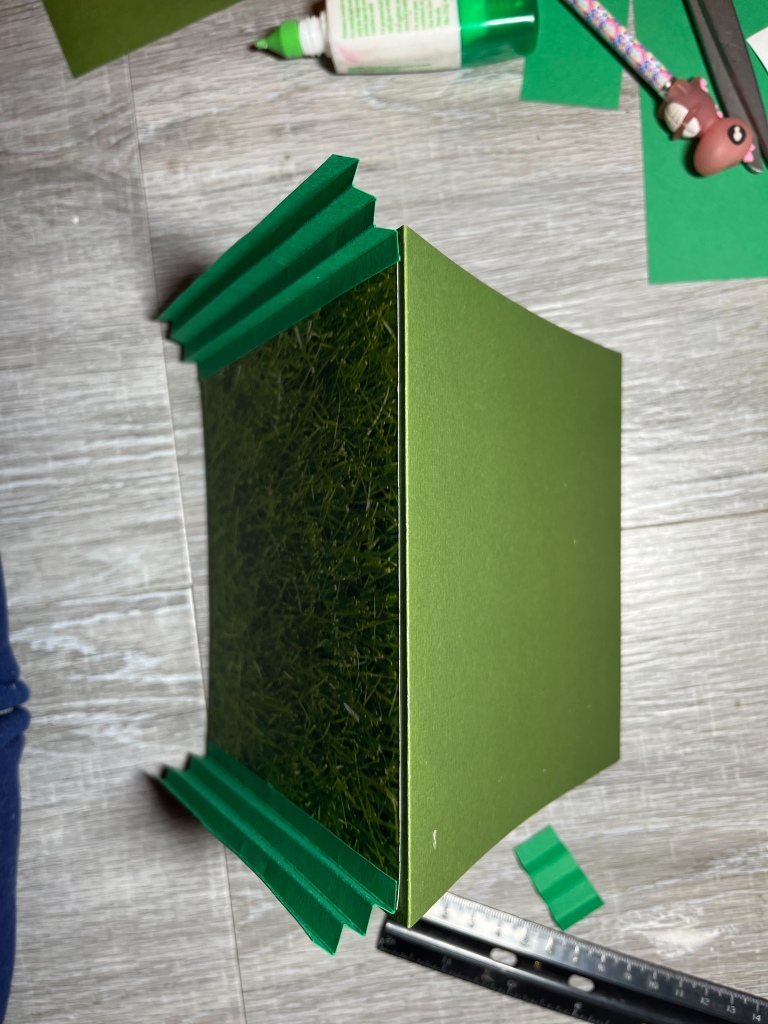
A trick to doing this is to glue them facing each other. Because they are accordion folded, look at them like two “Z’s”. Whichever way you glue one, glue the other one the opposite way so they are mirroring each other. Otherwise, when we get further into the project, the inside layers for the sheep are not going to line up. The sides in the picture above were from my first attempt. After this first experimentation, I decided to add two more 1/4″ sections to make the sides 1 1/2″ wide. I set this under a book to dry. For the face layer, I cut a scrap of green patterned cardstock from my stash just a tad smaller than the 6×6″extra piece of the base cardstock I had cut. Before gluing them together, I used my concentric oval Anna Griffin dies to cut the insides of this card face layer out. The larger oval die was used on the patterned paper and the smaller oval die was used on the green cardstock layer.

A trick to getting them lined up is to first cut the top layer withthe larger die. when this is cut, lay it over the second layer of cardstock and set the smaller die into the cut area. Position it exactly where you need it, then remove the top cut layer.

This gives the framed look when they are attached.

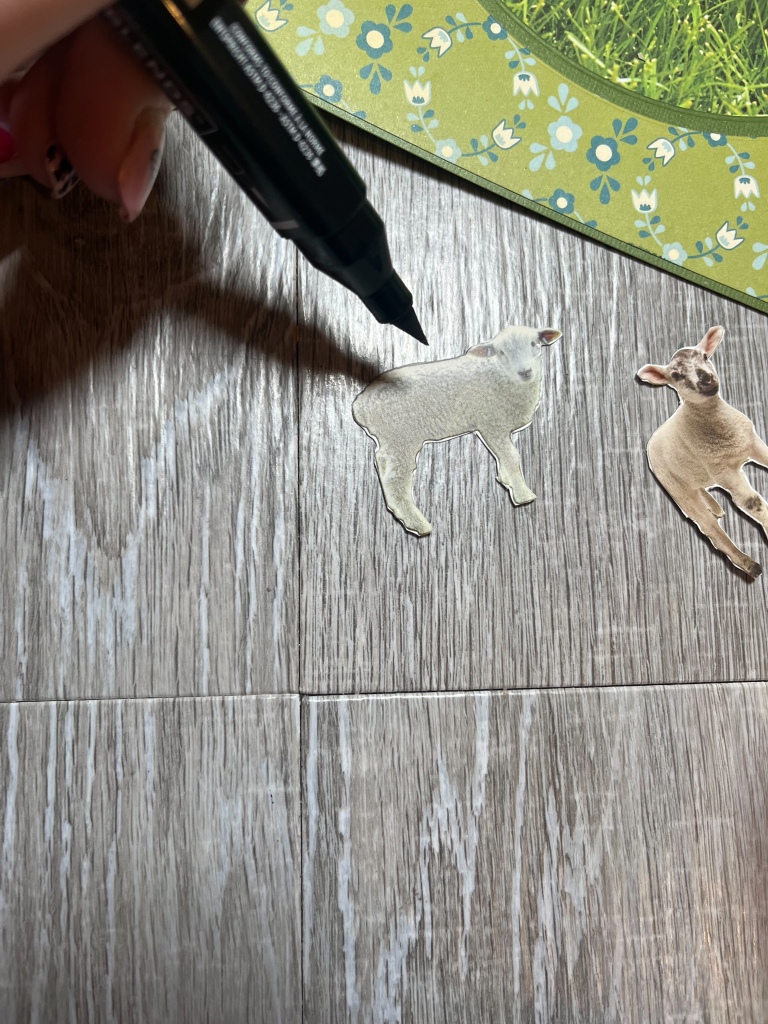
Once cut I adhered these two layers together and I glued this to the sides, on the card base again, setting a book on it. Next step was the sheep. I have had this flock of sheep roaming my stash for so many years! So I know they are just as happy as I am to finally have them in a project. Now, they are stickers, so I stuck them to scraps of white and green cardstock and fussy cut them out.

I used a dark Gray Granite Stampin’ Blends alcohol maker from Stampin’ Up! to go around the cut edges and soften them so they didn’t look fussy cut.
To give the sheep a place to hang out in the grassy field, I measured and cut some of the grass paper to fit inside the card face layer.

I trimmed across the top of them with some jaggedy bladed pinking sheers.

I cut two of these scraps and slid them inside the card face with glue on the ends so they would stick to the folds in the accordion sides.

I attached the sheep with Altenew adhesive foam tape to these grassy layers. The ivy and tulips are super old stickers from my stash. The shamrock was a sticker as well but I wanted him raised up so I stuck him to some green cardstock and fussy cut him out, attaching him to the card face with more foam tape.


The picture above shows a top-down view into the accordian side of the inside of the card face layer.
I have to say I am beyond excited with how this project came out. I haven’t done this accordion sided construction in a card before. What’s cool about it is that it collapses flat to slide into an envelope, so you can do these sides to any shape card! Below are my affiliate links so you can snag some of the products I used in this project. I can’t wait to see your own take on this month’s inspiration picture! Make sure to tag me on Instagram @scrappystampthefunup or leave me a comment right here on the blog, letting me know what you thought of this project. Also, catch me on You Tube for all kinds of crafty goodness. Until next month, have some crafty fun!!
Affiliate Links Below 🙂
https://www.stampinup.com?demoid=2232332

Saturday Crafting With Bridget Casey Designs for Altenew
Hello my crafty peeps! I wanted to share a few notes on some projects from the recent Saturday free crafting session hosted by Bridget Casey Designs for Altenew. If you want info on joining us for Saturday crafting fun, leave me a comment and I will get you the info 🙂 It’s the most crafting fun you can have on a Saturday!
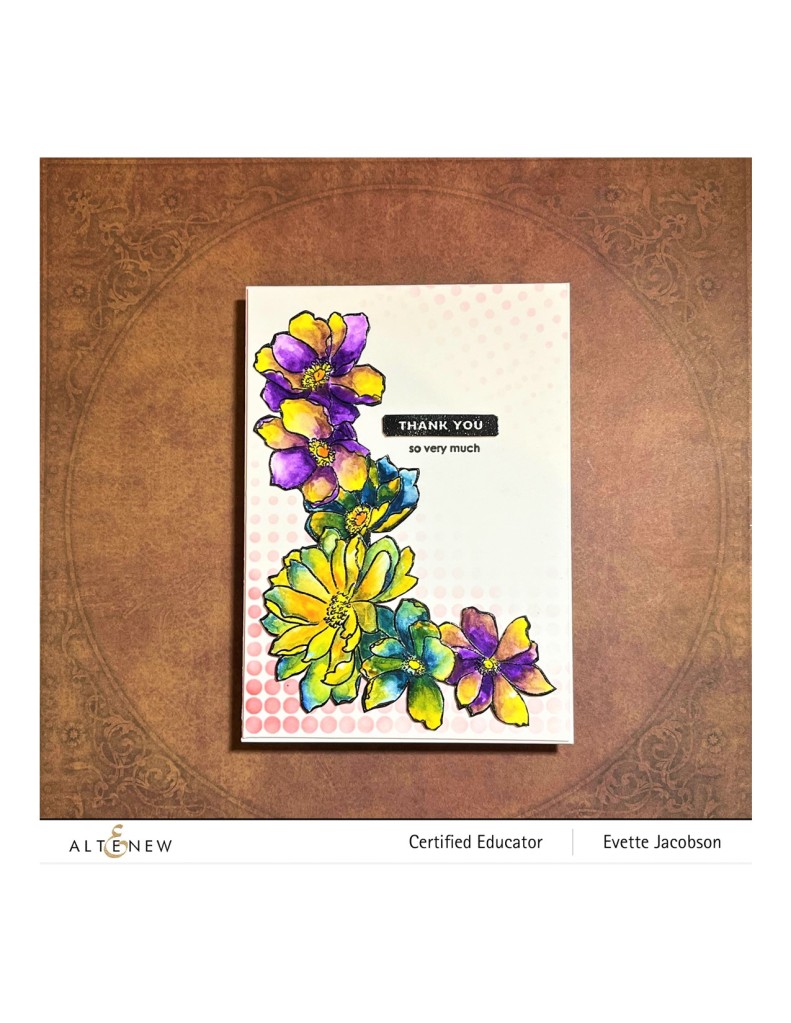
This first project we worked on featured water coloring with the Castle Garden stamp and die set.

This is an awesome, large stamp set, perfect for experimenting with different coloring mediums. We stamped the image onto water color paper with the Altenew Obsidian black pigment ink and embossed it with clear embossing powder. Using the Artist’s 24 pan watercolor set, I decided to break some color wheel rules with my paining. I used the complimentary colors of purple with yellow and orange with blue to prove you can blend opposite colors on a project without getting it muddy. I didn’t have the die set for this stamp so I fussy cut it out and cut it in half (like I said it’s a big stamp set.) I ran black alcohol marker around the edge to blend away the white core of the cardstock that was showing from being cut. I used Grapevine crisp dye ink blended through the Halftone background stencil, filling the lower left corner and then mirroring the stencil very lightly in the opposite, upper right corner. To get the sentiment stamped as crisp as possible, I first stamped it on a scrap of white cardstock with the Altenew Jet Black ink. Then I stamped over it with the black Obsidian and embossed over that with clear embossing powder and cut it out. I stamped the sub-sentiment directly onto the card face layer, then attached the larger sentiment above it, set up on dimensional tape. This card is on a 5 x 7″ card base, and the face layer with all the decoration is cut just smaller to give a very slight boarder, and it is popped up on Altenew dimensional foam tape.

The next project is a on a standard A2 size card base.

Since we were playing with watercolors, I did a background on a scrap of watercolor cardstock, using pinks and purples. I Cut a layer for this background using the Radial Circles Die and embossed it with the Cross Weaves 3D embossing folder. I then trimmed the painted layer to fit underneath and adhered thee layers together with Tombow multi glue. The flowers were made using the Altenew Craft a Flower Morning Glory die set. The layers are cut from left over scraps of painted watercolor cardstock. The sentiment is from the Circle Sentiments stamp and die set and I used the same method as with the sentiment on the first project. The decorated layer is also set up on dimensional foam tape.

I hope you enjoy these projects and if they have inspired you to try some water coloring, I would love to have you share your projects! Tag me on Instagram @scrappystampthefunup or leave me a comment right here on the blog. Also, you can subscribe to my You Tube channel Stamp The Fun Up, I would love to have you! And don’t forget to catch me live weekly on Facebook also at Stamp The Fun Up. To get yourself the supplies used in these products, hit up the links below the Mini Wild Dog Rose info to the Altnew shop and Tombow for the mulit-glue and other awesome goodies. Thanks for stopping by!

Inspiration Station February Blog Hop

Hello everyone!! Welcome to another blog hop for The Inspiration Station!! So awesome to be back for February’s inspiration. I love this phot because it is definitly all about the warm and fuzzy lovey stuff, but it’s not in the traditional “Valentines” colors. Love is all year round and I was really inspired by that image portrayed in this photo.
I wanted to have roses in this design because regardless of the fact that this inspiration photo isn’t in traditional Valentine colors, I felt that roses done in these colors would still get the point across. The first thing I did was choose my ink palete from Altenew crisp die ing and then stamp and die cut the images from Altenew’s Painted Rose stamp and die set

The next thing I did was cut a standard fold 5 x 7″ card base from Nenah Classic Crest Solar White 80lb cardstock. I took the flower die from the set and traced it three times along the opening side, front flap of the card.


After I traced the inside of the die (note, in the top right photo, that just a little bit of it is hanging off the edge-I did this at the top and the traced die at the bottom) I used my very fine point, sharp scissors to cut off the traced area.
With the neutral palette of this card, I decided I wanted the rest of the card face to be a clean and simple card and my secret to that approach is to add texture. I am absolutely loving the Cross Weaves 6×6 3D embossing folder from Altenew so that was my choice. However, the embossing folder is 6×6 and the card face is 5×7. So, I had to open the card, lay it face down on the cutting mat of my die-cutting/embossing machine and run the face through twice to get the entire surface embossed.

First run of the card face through the embossing machine.

To run it through the machine a second time to finish the embossing, notice how for this run I rotated the folder and turned the card base.

The finished embossing. You can, of course, clearly see the separation between the two runs of embossing. No worries, that will be perfected shortly 😉
Next, I glued the inked flowers onto the die cut edge of the card face.

To cover up that embossed separation line, I cut another rose and some leaves from scraps of white cardstock and stamped the sentiment on the white cut out rose. Cutting these embellishments from white give the clean and simple look more depth and interest.


And that is it for this simple Love card. I hope this project inspired you to not shy away from your embossing folders just because they don’t fit the card size you want to use. Please leave a comment and let me know what you think of this project or share what you did for this hop! You can also follow me on You Tube at Stamp The Fun Up and on Instagram @scrappystampthefunup. Be sure to click the link below to head over to the Inspiration Station blog to see all the other inspiring projects. Below that link is the link to the Altenew store so you can grab this awesome stamp and die set. Thanks for stopping by!! See you next month!
https://inspirationstationchallenge.blogspot.com
Shop Altenew Below!

Inspiration Station January Challenge

https://inspirationstationchallenge.blogspot.com/

Happy New Year! I love this month’s inspiration photo. It has the kitty cat staring out the window to what I imagine are all the possibilities to come in the New year. I was inspired to keep my project simple and focus on that thought. The background is sponge painted through an old stencil with Altenew Watercolor Essential 12 Pan set, using the blues and a little back. I angled the stencil on the left side to create a feeling of that curtain in the inspiration photo. Before removing the stencil, I watered down some gesso and splattered it all over with a paint brush. After removing the stencil, I came back with the gesso and sponge painted the whole area to blend the stenciled area into the un-stenciled area where the “curtain” would be on the left side. The panel was then adhered to a red layer of cardstock with Tombow Multi Glue liquid glue. To keep with my minimalist approach to this project, Imade a sentiment strip out of green and red cardstock scraps and embossed the sentiment using Altenew Platinum embossing powder. The cat was cut with an older Spellbinders die from black card stock that I had painted with Altenew Metallic Watercolor 14 Pan Set. I used scraps of blues and white cardstock to cut out snowflakes with the Layered Snowflakes 2 die set from Altenew.

I hope you like this project, and I can’t wait to see how the inspiration photo inspires you! Tag me on Instagram @scrappystampthefunup or leave me a comment here on the blog.
May the New Year be as full of potential as a clean slate for you and may it be filled with lots of crafting!!
To snag the Altenew supplies I used in this project, click the link below:

Inspiration Station Blog Post Challenge
https://inspirationstationchallenge.blogspot.com/

I absolutely loved this challenge’s inspiration photo!! I may not be a fan of marshmallows, but there was definitely a lot more to this inspiration photo that really spoke to my creative side.

I was inspired by the red and green colors in the inspiration photo, and the fact that for some reason, more than any other, I associate Christmas with drinks. Any kind of drinks lol: cocoa, holiday flavoured coffee, rum, eggnog…. Nothing gives me more holiday feels than the holiday drinks that are associated with them!
For this project I decided to do a 6×6″ card base. I really love the 6×6″ card base when I want to portray a story on the front of my cards. And of course, it had to have red and green layers. The shimmery green card base is from my stash, but the red layer with the red shiny flecks is from Stampin’ Up! “Festive Foils” 12×12″ paper pack. The focal point layer is Classic Crest Solar White 80 lb. cardstock blended over lightly with very pale green inks from Altenew. I kept it very light in the upper right and lower left corners (I had in mind a three-part sentiment). Next, I stamped the baubles from the Stampin’ Up!! “Decorated With Happiness” stamp set onto masking paper, fussy cut them out (minus their strings) and stuck them down around the center of the card. Placing the masks over the inked background gives the baubles a subtle, almost neutral finish without being stark white. To keep the attention to the center of the card, and mimic the layout of the inspiration photo, I paired Altenew Crisp Dye Inks with the pine-bough stamps from the”Decorated With Happiness” up along the opposite corners. I removed the masks and used Altenew Platinum embossing powder to stamp the baubles. To keep them neutral but give them a little life, I added some reflection marks with Sharpie Poster Paint Pen in white and added just a bit of sparkle with Spectrum Noir Sparkle Marker in Clear. Combining the sentiment stamps from the two stamp sets with Recollections brand embossing powder in Ruby, I added the sentiments in the upper right and lower left. I used a scrap of red glitter cardstock trimmed into a retro geometric shape to center the card. For the final touches I embossed a panel of white cardstock with Alabaster embossing powder from Brutus Monroe and die-cut the “Cocktails” and “Coffee” words from the “Nothing’s Better Than” stamp and die set from Stampin’ Up! This gave them just a bit of marshmallow feels. This is my favourite Stampin’ Up! set, by the way. From this set I stamped and die-cut the coffee cup and the froo-froo drink and colored them with Altenew Artist Markers.
I really, really want to just crawl into this card lol. I can’t wait to see how this challenge inspired you! Links are listed below so you can shop for the Altenew and Stampin’ Up! products used in this project. Tag me on Instagram @scrappystampthefunup or leave me a comment here with your creations! Have fun

